The SNOWBOAT
An Electric Powered Canard Pusher Flying Boat
Designed & Built By Bruce K. Stenulson
This page was last updated on March 3rd, 2006
The SNOWBOAT Design Concept:
Here in the high Rocky Mountains of Central Colorado, we do a lot of our flying from snow. I wanted to design a light weight Flying Boat aircraft which could be flown from snow, water, or even wet grass when desired- an all-season flyer. I also was interested in implementing a canard setup, using a light weight brushless motor set up in a pusher configuration, and mounted high enough so that the propeller would clear the ground / snow / water on landings & takeoffs. A large rudder is included to provide for good ground handling / snow handling / water handling. The "SNOBOAT" is the result of my efforts.
The photo below shows the SNOBOAT ready to take off at Lake Dillon, Colorado on a cold & breezy day. It gives you an idea of the country we fly in regularly.

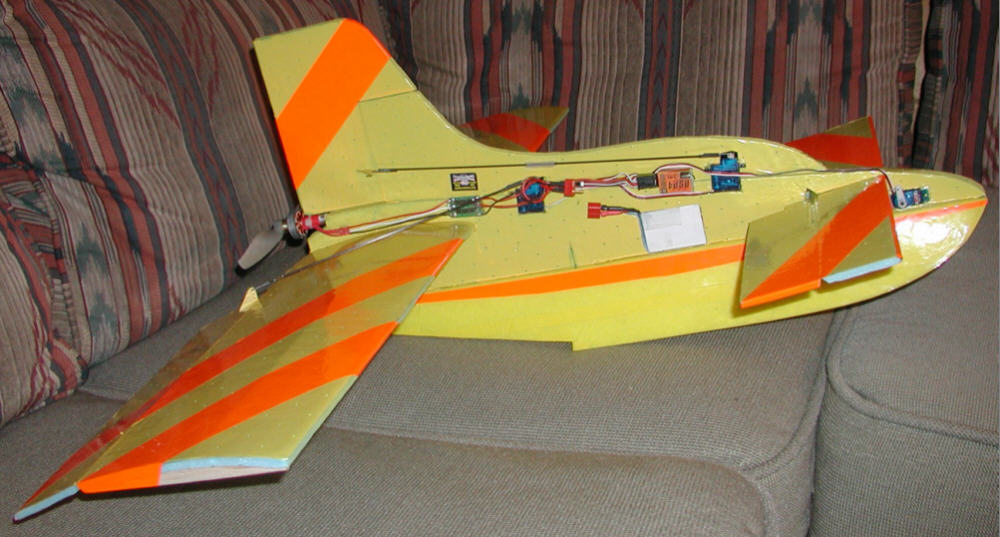
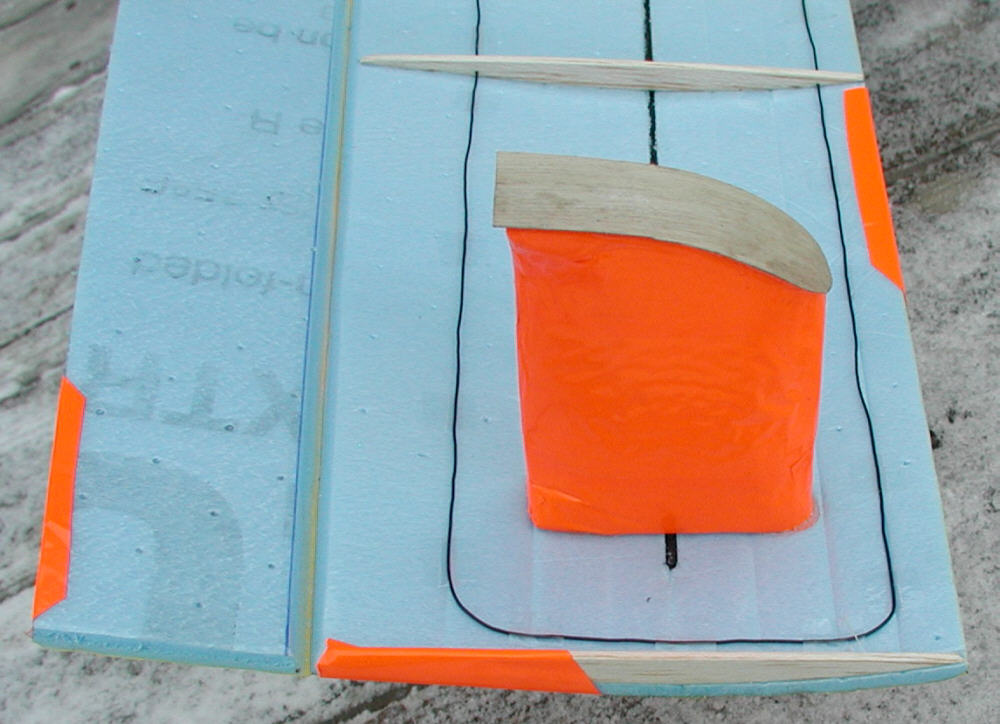
Sponsons are added under the outer sections of the main wing for better handling on snow & water. (Later photos show these in place.) A flying weight of about 12 ounces was the target; with sponsons and the tracking rails / hull side spray rails installed, the "SNOBOAT" is ready to fly at 12-1/8 Ounces using the 2 cell 1200mAH Lithium Ion Battery; with a different 2 cell 1300mAH LiPo battery that is presently on order, the flying weight will drop back down to 11-3/8 ounces.
(I'm reproducing an edited version of some of the info I first posted in the other thread, so it's all right here.)
Here in the high Colorado Rockies, we have snow on the ground & lakes a lot of the year (December through April are prime snow flying months.) Many of my planes have flown their first flights from snow on skis over the years; several others were designed for float flying, and stay on floats all year, waiting for open water in early May. (At 10,000 feet, spring does not arrive too early...)
GPW's Foam-EZ canard caught my interest, but I was looking to design something in a new light foamie to fly from both snow & water. So I started to lay out a flying boat hull design, with a forward canard and rear wing, and with the motor mounted high enough to clear the snow / water on takeoffs & landings.
The hull section is made from a block of scrap EPP foam, 1.3# density, left over after cutting slope combat ship fuselages. I cut it to shape on a band saw. There is a layer of 1/64" birch ply on the forward hull to give it good durability for snow & ice handling; there's also a 15 degree side cut away from the bottom hull running surface to allow it to easily get up on step out of the water for easy lift-offs. After a coat of Super 77 spray, colored packaging tape covers, seals, & waterproofs the hull.
The upper 'superstructure' is BlueCor. Three layers are laminated together for the main section, going into single thickness above. It is then epoxied onto the top (uncovered section) of the EPP Hull. This gives plenty of strength without having to use a 'crutch' or lengthwise spar, and allows burying the radio gear & servos into the fuselage for minimal wind drag.
A rudder is really necessary for good water handling & snow flying, so I incorporated a large counterbalanced one.
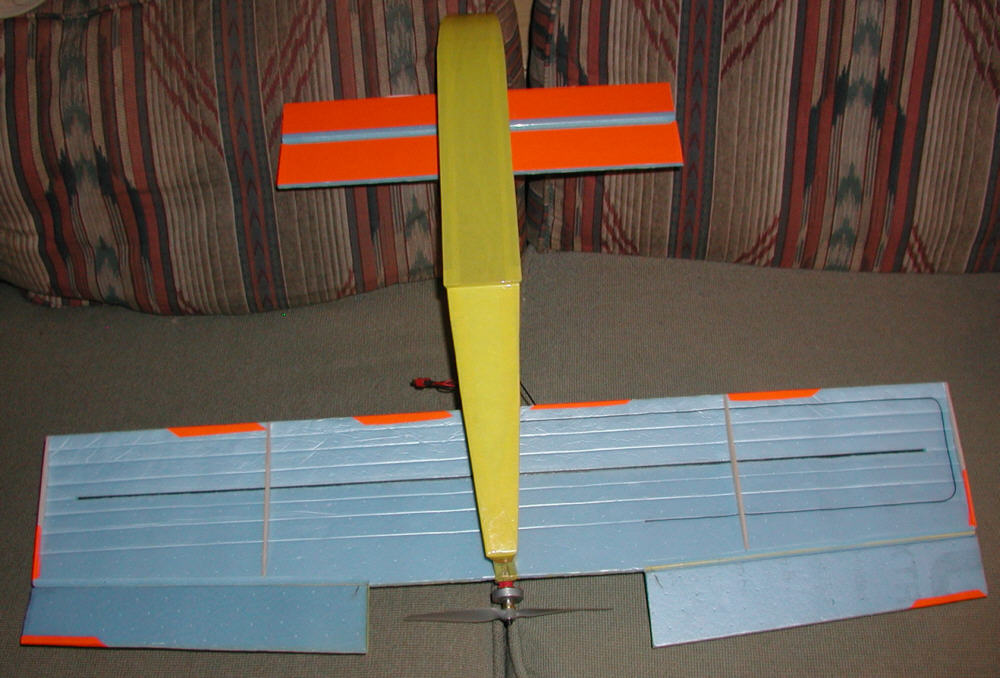
Wingspan is 32", with a somewhat tapered planform, large ailerons, and about 232 square inches of surface area. A .125" carbon fiber tubular spar is inset in the lower surface, and the wing is undercambered. There are four 3/32" balsa 'ribs' to help hold the airfoil curvature.
The Canard & elevator have a span of 15" with a chord of 4.25", for 63 square inches of area... about 25% of the wing area. A .125" dia. CF tube was used as an elevator stiffener, with a 1\32" birch ply control horn glued both into the foam & to the CF tube. There's also a .125" CF tube at the canard's leading edge. Two long bamboo toothpicks are epoxied down through the canard, through the upper superstructure & deep into the EPP boat hull section to give a lot of strength to that area of the aircraft.
The motor is a 'single stack' CD-ROM motor built for me by Keith Brown of LaPue Skunk Works; it's wound to run on 2 Lithium cells. I'm using an APC 7x4 propeller for initial flights. The ESC is a Castle Creations Thunderbird 9.
Servos used in this aircraft are HITEC HS-55s; control rods are solid carbon fiber rods with ~.040 music wire Z bend ends.
I have only my rough hand drawn working plans for now, & will be flying this aircraft to fine-tune the setup before I think of drawing more complete plans, so they are not available at this time. But the photos may give some of you enough info to scratch together something similar if you are inclined.

SNOBOAT SPECIFICATIONS
Wingspan = 32"
Wing Chord (With Ailerons) = 7.85" at tips to 8.7" at inner ends of ailerons
Wing Area = 242 Sq. In.
Airfoil: Flat Plate with undercambered curvature
Effective lifting surface loading: Roughly 6 Ounces per square foot
Canard Span = 15"
Canard + Elevator chord = 4.25"
Canard + Elevator combined Area = 63 Sq. In.
Overall Length = 24.5"
Controls: Ailerons, Eevator, Rudder, and Throttle
Motor = CD-ROM Motor, Brushless Outrunner built by Keith Brown
Propeller: 7x4 APC
Input Power = about 60 watts under static load : Current at 8.5 Amps
Power loading = 80 watts per pound
ESC = Castle Creations Thunderbird 9
Battery = 2 cell Lithium, 1200mAH
Servos : 3 HITEC HS-55
Micro 4 Chanel Receiver
Set Up To Be Flown with Airtronics RD 8000 Transmitter
Flying Weight as shown in these photos = 12-1/8 Ounces with the 1200mAH Lithium Ion battery pack, after the Sponsons are installed under the wing outer sections, and with the hull side spray rails / tracking rails installed to each side of the hull. (By switching to a 2 cell 1300mAH LiPo battery, flying weight will drop back to about 11-3\8 ounces.)
Boat Hull = 1.3# density EPP Foam Block cut to shape; Superstructure, wing, & Canard of BlueCor Foam with Carbon Fiber Spars & Carbon Fiber Control Rods
Boat Hull running surface sheeted with 1/64" birch ply, & entire hull waterproofed with plastic tape covering



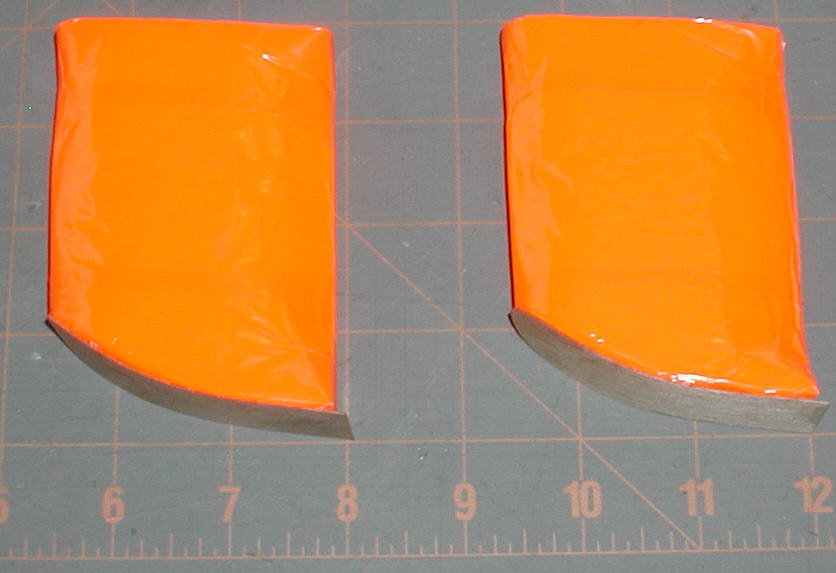
Below are photos of the EPP foam Sponsons (wing tip floats) which I made and installed next; they weigh 1/4 ounce for the set after covering, ready to be glued in place. (I used epoxy to mount the 1/64" ply bottom 'ski' hard surfaces, and to mount the sponsons to the wing.)

Below, photos of the SNOWBOAT with it's sponsons mounted, out in the snow.
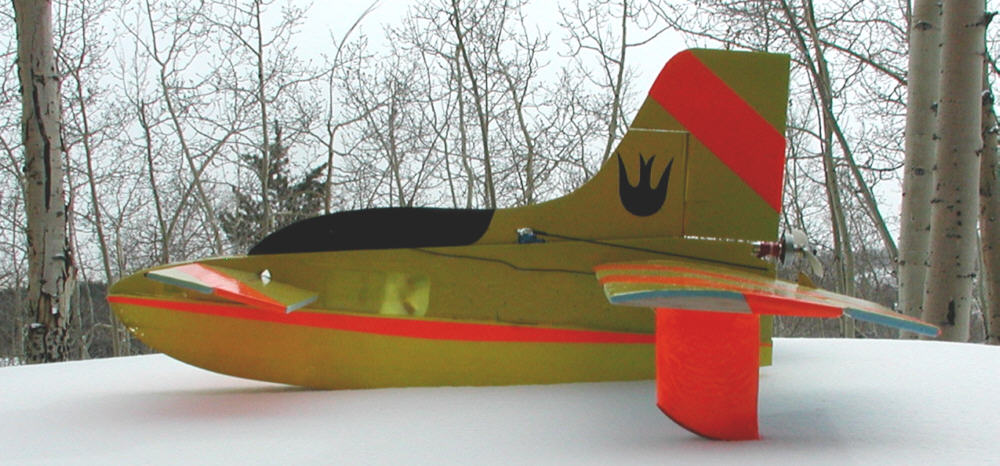

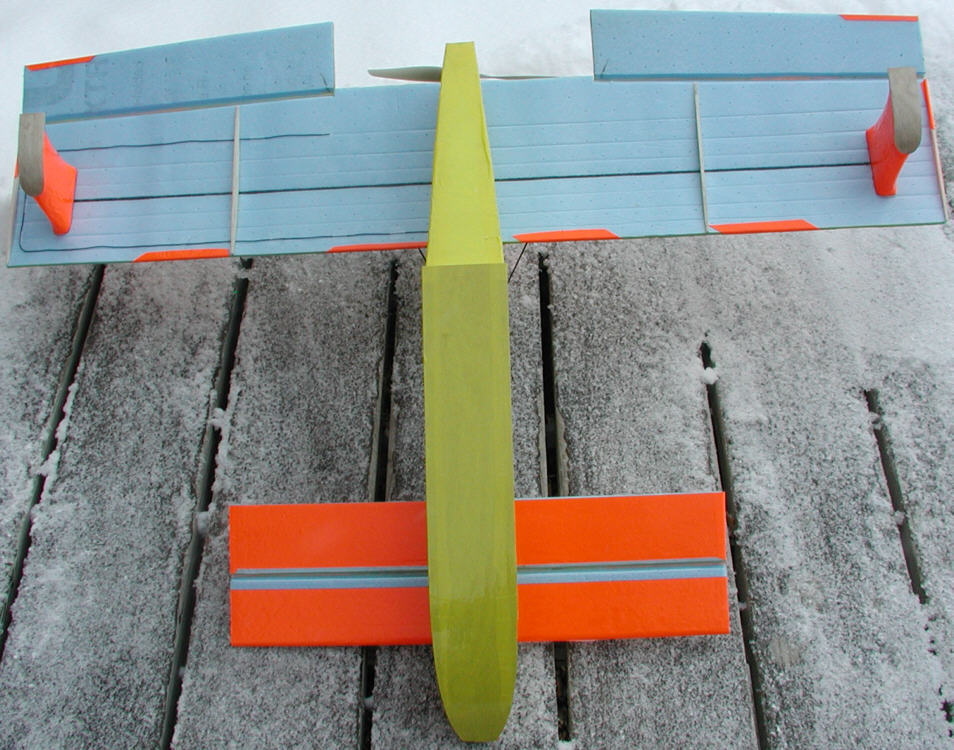
The last detail to be completed is shown in the photo below: adding the side rails to the hull for good tracking in the snow. ~4" long by 5/8" wide sections of ~1/64" thick stiff plastic sheet are shaped and glued to the tape covering on each side of the hull with CyA glue, with the back edge extending to the hull's step.
In order to allow for good ground / snow / water handling, I added 'rails' along the outer edges of the hull for about 4" forward from the step; without these, in any cross-breeze the aircraft would weather-vane and be prone to ground-looping. The 'rails are simply 4" x 5\8" firm plastic sheet, CyA glued to the sides, with the back ends even with the step. They only extend below the hull about 1/8".
[Added note: A different adhesive, such as Super77, may do a much better job than CyA glue for adding the plastic sheet hull side rails to the tape-covered sides of the hull.]
<
SNOBOAT First Flights & Setup Tweaking: written 12-17-2005
How did it go? Well, first flights are many times 'flights of discovery'... I had followed advice in the "Foam-EZ Canard" thread on setting up the ailerons to 'follow the contour / curvatire of the wing". With wide ailerons that are mounted at the rear of the aircraft and act more like 'elevons' if deflected down, this was not the best suggestion I've ever tried. The canard & elevator does not have enough authority to counteract this 'down elevon' effect; this might not be as obvious with narrower ailerons, but with the wide ones I built, it was VERY OBVIOUS!
After re-setting the aileron linkage lengths for 0 incidence relative to the chord line of the wing, the SNOBOAT was back out another day. By this time, however, the Kite-Boarders had been out playing with their toys at the Lake Dillon flying site, leaving the surface very cut up and rough... (not much like it was when the photo had been taken.)
The SNOBOAT took off very well from the snow surface & was flying OK, but this time the less-than-adequate batteries I had tried to use were showing their shortcomings; the power would slump & drop off about 15 to 20 seconds into the flight, to the point where the aircraft could no longer maintain altitude, so it was time to set it down quickly. [These were some Li-I surplus cells that do OK at lower current draws in a slowflyer, but which would not sustain the under-load voltage and the 8.5 Amps which this motor is set up to draw.... ]
[New 10C 1300mAH LiPoly batteries were already on order, which will do the job well, & drop the final flying weight after a couple of other minor wing L.E. & T.E. reinforcing modifications to 11.5 ounces.]
Snow handling over the rough snow surface was hard on the Snoboat's wing; once sponsons are in place, the potential fource on the wing when the sponsons encounter an obstacle is quite impressive. This resulted in cracks in the BlueCor at the leading & trailing edges of the wing just on either side of the fuselage. To reinforce these stress points to handle the new forces that the Sponsons impose on the wing during snow running / obstacle impacts , I added a 6" piece of solid .050" C.F. rod to both the leading edge and trailing edge, epoxied to the wing & fuselage.
Weather & snow conditions have not been suitable for further flights since these modifications were made and the new battery packs arrived, so I'm looking forward to getting out for some extended flying time. That's on the schedule for Sunday the 18th; I'll post another flight report.
SNOBOAT flight report
On Sunday, December 18th, I had a chance to fly several flights with the SnoBoat during the South Park Area RC Society's annual Christmas Fly-In & Party. Temperatures were cold early in the day with light snow falling, but winds were minimal to non-existant most of the day, and the snow conditions at Teke' Lost Creek RC Airpark were in superb shape - something that is lacking near home in South Park, where the winds have been heavy enough often enough to eliminate whatever snow that has fallen here.
Takeoff handling on this hull design is great, requiring only slight right rudder for a brief couple of seconds as power is first applied. It lifts off of the snow easily within 25 feet. As this was the first time out with decent snow conditions and the new great batteries (2 cell 1300mAH 10C Dymond LiPo's) I'd been waiting to fly, the setup still needed some final tweaking - mainly in setting the ailerons to a slightly reflexed up position in relation to the wing (to counteract any "down-elevon" influence in the wing's lift characteristics.
Once the reflex was set into the ailerons after the first few takeoffs & landings, the low speed elevator authority was much improved.
The next 'tweak' that became obviously necessary was to shift the balance to the rear farther, to get some of the weight off of the canard / elevator. This improved flight characteristics further, but after making this adjustment, the aileron servo began to show signs of having picked up some moisture from the snow, and was beginning to 'migrate' in it's center position. This ended the day's flying for the SNOBOAT. (I have seen this a lot while float flying over the years, but had never seen it in a snow flying plane; but I had taken this plane into Ron's warm garage to reset the aileron linkages earlier, so it warmed up there to melt any snow around the base of the servo horn & allow some moisture to seep inside, affecting the servo' centering.)
A couple of interesting characteristics were noted in the earlier flights; with the balance a ways too far forward, if I slowed the aircraft too much in a banking turn, it would go into a stable 'autorotation' spin that left it coming down to gently land in a nose-high attitude. (I repeated this unusual maneuver several times for the fascination and enjoyment of the other SPARCS menbers present; no damage was incurred in the process of any of these 'autorotation' type landings, and so the SNOBOAT was taken off & landed quite a few times that day.)
Early landings before the ailerons were reflexed & with the balance too far forward required carrying more speed to maintain enough elevator authority to flair right before touchdown. If more speed was carried on landing, the elevator had adequate authority to flair the aircraft just before touchdown. With the balance shifted to the rear and the ailerons slightly reflexed, this temporary handling characteristic was dramaticly improved; further flying & familiarization needs to be done when I once more get a chance to get out on good snow.
A few days later when I checked, the servo had stopped displaying it's preference for a new centering position- it was centering back where it had initially been set up. I'll use some light oil on the servo output shaft to eliminate the possibility of moisture penetrating at that area again. (It might be good to take the servo out, open the case, and make sure it has thoroughly dried inside... but it's hot-melt glued into place, and if it's not necessary, I'm hoping to avoid having to remove & re-install it.
[In retrospect, waterproofing servo case joints with some silicone teflon grease was always effective with non-waterproof servos in my earlier days of float-flying; this would be good to do for servos used in snow & water flying which are exposed, as they most often are on Foamies! It was always customary to wrap the radio receiver in some plastic food wrap to prevent spray from affecting the radio receiver, too, using tape or twist-ties around the servo leads & antenna exits... more incomplete details!!!]
When I once more get out on good snow, I'll finalize the setup tweaking and report further on the flight characteristics. This is a fun plane to fly from snow, with good roll rate & the ability to loop fairly tightly. (I've saved playing much with the rudder, except on takeoffs & landings, until other setup factors were tweaked & finalized further... that aught to be worth a few more grins!

NOTE: after another flying session, I'm still not satisfied with the airfoil on the rear mounted wing, and the fact that with the single aileron servo, it's impossible to trim the wing in the air. I'm strongly inclined to rework this design using a WILD WING wing (a flying wing bwith a reflex at the trailing edge of the airfoil), using dual elevon servos, so that I will then be able to adjust the elevon reflex precisely in the air. I'll likely use a custom mix from the Elevator channel into (channel 5?) to control the canard. These modifications may make the SNOBOAT into a far more stable and predictable flyer, which will be capable of some interesting aerobatics, and give it excellent stability as well. It's a project that ought to be fun to complete! Water-proofing the servos and receiver and ESC for water flying is another issue that was not dealt with in the original SNOBOAT build, either, so this is another design aspect to be worked out.

Plans are not available at this time; the photos may offer enough information to inspire some other builders to build something similar.)


This web site and all of the digital photos and other original materials found here are subject to protection under the Copyright laws; All rights are reserved by Bruce K. Stenulson, P.O. Box 69, Fairplay CO. (c) 2004-2006. Permission is granted to link to this web site or to it's individual pages, but not to reproduce any materials found here for other than personal, non-commercial use. My intention is to maintain the context within which this material has been presented.Thanks for your understanding.


