NOTE : The Sport Flyers "WILD WING" kit is available from HOBBYPEOPLE.NET; it sells for $29.99, but is often discounted to $19.99, or even $18.99
New alternate spars, Trailing Edge, Fins, & Motor mount : a build progress report.
After reading other's contributions in this thread, I looked at the Wild Wing core and kit version spar layout, and agreed that there was need of some kit-bashing in several areas.
My concept was to build it up light, for flying either with (or without) a very light weight outrunner brushless motor and a 2 cell LiPoly battery (if possible). The motor I am using is a GBv kit motor I built, using a CC Thunderbird 9 ESC, for a weight of only 1-1/4 ounces for the combination. (The flight batery can be as light as two ounces if the wing can be balanced with that light of a battery in the nose.)
(1) I wanted to achieve some span-wise structural strength with a minimum of weight; flexing the bare wing core made it apparent that the forward center needed a good cross-spar in the main weight / flight load bearing area. So I took the shortest of the 5 CF tubes provided in the kit, routed a slot with the Dremel router across at the the rear end of the battery mounting area (as shown in the photo) set deep enough so that the outer ends were just at the foam surface, and epoxied it in place. The flight battery fits forward of this added spar, with the lead running under the spar back to the ESC's connector. (More foam can always be removed for final balancing via battery placement adjusting if necessary.)
(2) The three piece tubular trailing edge did not appeal to me from a couple of standpoints; I decided instead to install a one-piece spanwise spar. I am using a 1/8" diameter C.F. Tube that is 29-1/2" long (from http://www.IntoTheWind.com ) I again used the Dremel router to route a channel into the foam for this spar. It's 2-1/4" forward from the center section trailing edge.
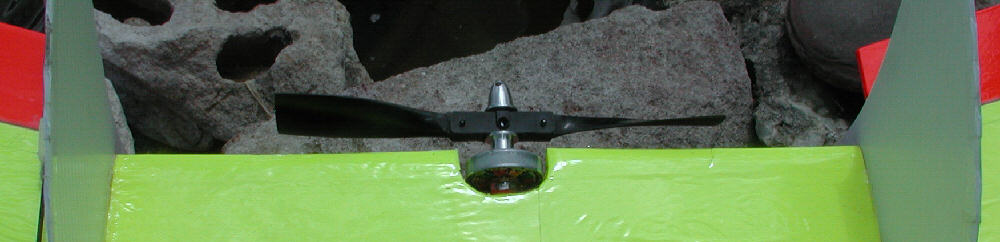
(3) The motor mount approach was a major issue; others have already spoken of the incorrect incidence / thrust line of the stock molded plastic motor mount. I was already intending to use a different style of motor, and wanted to install it right into the core of the wing, with the wing oriented at roughly one to two degrees positive incidence relative to the motor's thrust line. (I also wanted the option of removing the motor from it's mount quickly and easily, to be able to fly this same Wild Wing on the slope without the power system installed, installing a receiver battery instead.)
Since I built the GoBrushless kit motor with a brass tube mount, I added a plastic tube outer bushing onto another section of the 1/8" tubular C.F., to slip fit inside if the motor's brass tube. (A small screw will be used to lock the motor in place on the mount shaft while flying.)
I routed a channel into the wing's underside for this C.F. tube motor mount; it's front end is just below the radio hatch cover seating surface, while the rear end places the motor centered on the wing's trailing edge. I inset the motor mount position forward into the foam so that the prop will just clear the trailing edge by roughly 1/4"; (keeping weight forward is a good thing!)
(4) I wanted a definite clean hinge line for the ailerons. (The round tube wasn't going to offer this.) I sorted through my 1/4" balsa triangle stock to find a fairly dense / strong grained piece, trimmed the foam back a bit. and epoxied the two sub-trailing edges in place flush with the wing's upper surface. I trimmed away the excess balsa flush with the lower surface after the epoxy had set. With the 45 degree bevel on the balsa sub-trailing edge, the ailerons can now be hinged without beveling their leading edge; (I prefer tape hinges, using 3/4" wide Scotch 'multipurpose' clear tape on both top and underside.)
Oh, and I also filled in that funky notch in the ailerons with more balsa, too!
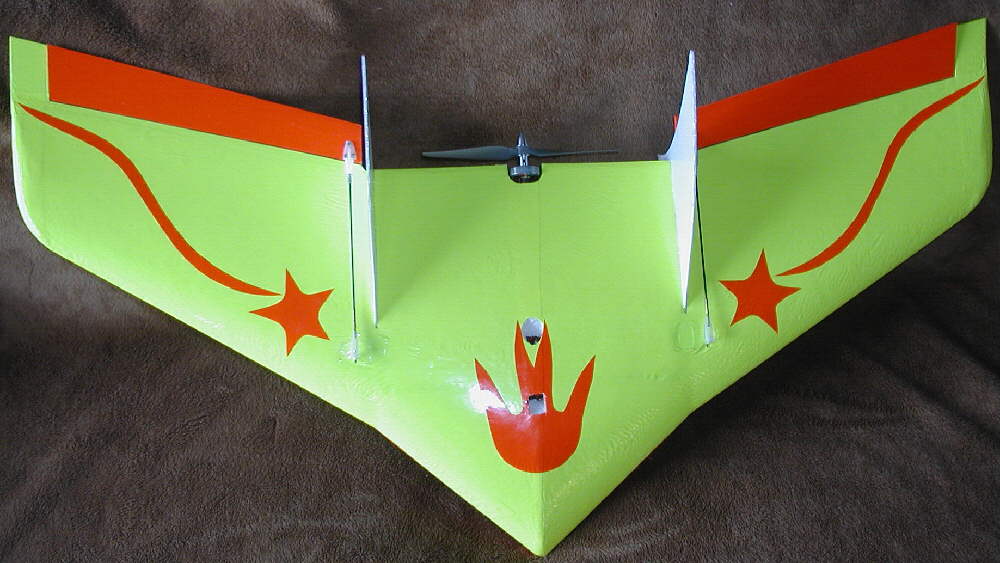
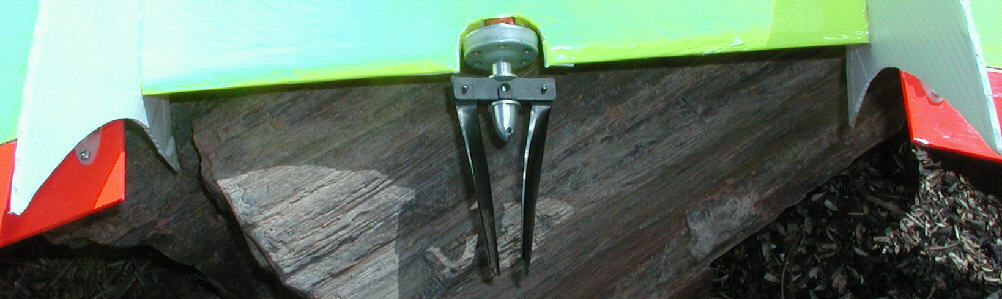
(5) I wanted the fins / vertical stabilizers to be more solidly attached into the wing core, and I also wanted to enlarge them a bit and extend them below the trailing edge; There's a 2mm wide slot behind the rear wing spar into which these new 2mm coroplast fins will be epoxied once the covering is completed. (see photo.) [The lower extensions of these new fins should also help protect the motor and prop on landings.
I'll be installing HITEC HS-81MG servos, and using a BERG 4L receiver in this Wild Wing. The next step is to get it outside and spray it down with some 3M77 spray prior to adding a modest amount of 3/4" wide nylon filament tape in a few select locations, then adding some covering and trim for high visibility. I'll report further once this light wing is flying!
(Other projects are detailed on my web site: I've been building Electric powered RC aircraft since the mid-1980s. I also build slope ships, foamies, float & ski planes.)


Wild Wing Kit Bashing Mods: Update : [Posted March 17th, 2006]
Attached are three more photos of my Wild Wing Kit Bashing project. I decided to install fixed wing tip sections, to protect the elevons and therefore the servo gears and linkages from damage which might otherwise occur in rough landings. With these in place, I felt more comfortable using the lighter weight HITEC HS55 servos.
Servo linkage rods were made from .060" diameter solid C.F. rods. [note: later replaced with metal for slope / slermal flying durability)
Minimal nylon filament tape was added to the leading edge and wing tip areas before the Fluorescent Orange and Fluorescent Yellow Ultracote covering was applied. The modified 2mm coroplast vertical stabilizers / fins were then epoxied into deepened slots in the wing core.
The motor mount fixture is just visible at the trailing edge center; for non-powered slope flying, it keeps the wing aerodynamicly very clean. It is a very quick porcess of slipping the motor in place and adding one securing screw to be into the E-powered flight mode.
Flying weight in the slope flying configuration balances out with the battery placed as shown at a weight of about 10-3/8 ounces to 10-1/2 ounces.
For E-powered flight, in order to balance out the added modest weight of the small outrunner motor, I am setting up to fly it with a 3 cell 1500 mAH LiPoly battery pack. This puts the E-powered flying weight up to 13-3/8 ounces (once all of the access hatches are in place and trimmed out.)
(NOTE: A later update to HITEC HS-81MG servos and metal control rods put the flying weight up to 14-3/4 ounces; see later postings to this page. )
With a wing area of 290 square inches (2 square feet), this puts the wing loading at 7-3/8 ounces per square foot.


[Posted March 18th, 2006]
Quote: Originally Posted by m4rs : Thats pretty light! Mines at 16+oz's. It seems happy there, flys pretty fast with that bp21, but need to try different prop combo's. I couldnt get it to balance with my lipo's. Ended up adding lead to the nose.
Bruce's Response: I tested the 16 wrap outrunner I'd built with an APC 7x4 prop mounted on it, and when running on the 3 cell LiPoly 1500 mAH pack, it's going to do GREAT!
The key to lightness is in having all of the parts behind the CG / balance point as light as possible; my fins / vertical stabilizers are heavier than the stock ones that come with the kit, and my elevons were fairly stout balsa. Ultracote in the standard thickness in the Fluorwescent colors is far from light covering... but I really love to build DURABLE aircraft, so these were all compromises I was willing to live with. For sloping, 10-1/2 ounces will likely be quite light- (maybe too light for stronger slope winds??!!?).
I may be adding ballast on heavier wind days, but wanted it light enough for the light lift days, of for "SLERMALING" - riding waves of thermal lift coming in and separating off the top of the slopes earlier in the day, before the slope winds build up to carry the heavier slope ships.
E-powered slopers are really ideal for this 'Slermaling', as they can venture out upwind to find the bubbles of lifting air, ride them back in to the slope, then head out to find the next bubble of lift to ride back in. (We get a lot of this type of lift about mid-morning on William's Peak, before the wind builds to combat conditions.) Other flyers on the slope can play tag-along when the lift is in close, then land up top while the following cycle of colder sinking air is passing through, ready to launch as the next bubble of warmer lifting air just arives to the slope.
Building an E-powered version with some sort of 'mid-motor' setup would be worth considering; if you can inset the motor roughly 3" forward with the prop swinging in a slot, you could balance out the Wild Wing with a very light 2 cell LiPoly.... food for thought- it's got me scheming already... [Hope the Wild Wing kits are put back on sale again soon!]
[Posted March 18th, 2006]
Below are the photos of the final setup.
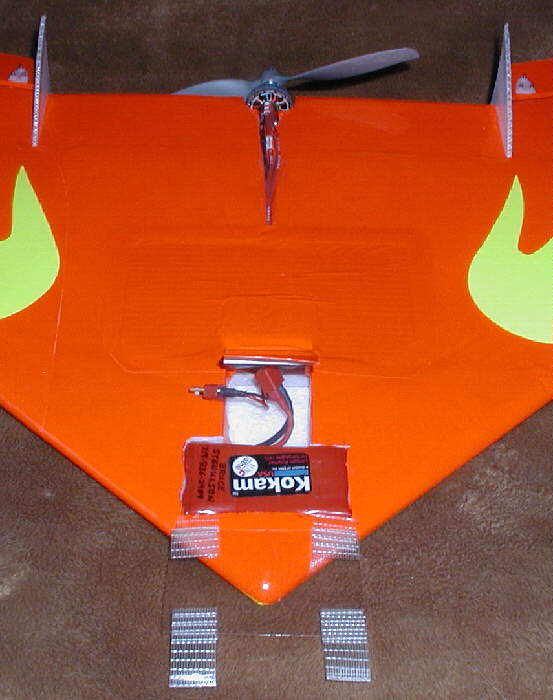
One of the final major issues I addressed was where & how to mount the castle Creations Thunderbird 9 ESC; I anticipated running enough amps to crowd it's rating, and wanted it to have good cooling air flow over it, without having it hanging out on the under surface of the wing where it would be more vulnerable to landing damage.
(Hey- it's bad enough having the LiPoly battery on the bottom surface close to the nose... I may have to devise further protection for that yet; maybe a sheet fiberglass hatch cover skin?...
But there should be no need to trash the ESC in rough terrain landings, or to possibly get it wet landing in damp grass or snow. And E-powered slope flying is still going to involve loandings on rough terrain more often than not!
I ended up cutting ~1/2" square cooling air "ducts" coming down into, and then going back up out of the main hatch area where I decided to mount the ESC- they are coming in from, and going back out to the wing's top surface. (Hey- I sorta hated messing up the pretty graphics & covering, but this s not intended to be a Hangar Queen- it's meant to fly!)
The ESC is mounted on edge into a shallow slot in the interior EPP foam with a couple carefully applied dabs of hot melt glue. The idea is to adequately mount it, centered in the air flow between the in & out air ducts, without blocking airflow over either the 6 Mosfet transistors on one side, or the BEC voltage regulator on the opposite side of this ESC.
After this was completed, the three-section lower hatches were trimmed out to match the belly with more Fluorescent orange Ultracote. The battery hatch cover is a sheet of clear plastic, hinged & closed with nylon filament tape. The main hatch has the forward 'tongue' hinged for access to the battery connector; it tucks in under the battery access hatch / cover.
Balance is now at 1/2" forward of the rear edge of the larger hatch cover, as recommended by several contributors to this thread- thanks for the tips, guys!
I also added a small clear plastic shroud over the top air duct openings, sort of a mini air scoop setup, to maximize air flow; the forward air scoop only extends maybe 3/8" up from the wing surface and is a rounded profile only about a half inch wide, but it should do the job of keeping the ESC inside nicely cooled without adding noticable drag.
Flying weight as set up to fly in the E-powered mode is now at 13-3/8 ounces. The wing loading is still under 6-3/4 ounces per square foot in the E-powered mode.
The motor is a GoBrushless GBv 22.7 mm kit motor I built up, single stator, using N50 magnets, and 16 wraps per pole of 26 gauge wire connected in a Wye configuration. On the three cell LiPoly pack with an APC 7x4 prop, static draw is 8.7 Amps, & it's *screaming* to get tossed into the air- lots of thrust! I'll check RPMs later- this bird is ready to FLY!
{Note that I'm doing my testing & flying at above 10,000 feet, with 16% lesser air density than at low elevations; if you fly the same 16 wind motor, 7x4 prop, & 3 cell LiPoly battery at sea level, you might realisticly expect to see roughly 10.35 Amps static draw.}
Unfortunately, the snow is coming down heavy as I finished this final part of the Wild Wing kit bashing prioject, so the first flight will have to wait a bit... [Snowfall comes with the territory when you live above 10,000 feet.]
Next up is my chance to experiment with the "grab it by the wing tip & discuss launch it while under power" technique... this could be entertaining!!! Who's going to hold the camera? Any last minute tips?

[Posted March 18th, 2006]
Quote: Originally Posted by mc727fly : Viking. Can you take a close up photo of your "Air Ducts". I can't see you're clear portion. How did you core them out? I'm thinking of doing the same to save my ESC. Thanks in advance.
Bruce's Reply: I've got the bottom main hatch covering ironed in place right now; the underside photo really doesn't show the lower / inside ends of the 'ducts' very well- appologies. I've taken one more photo of the top surface end of the ducts and their modest airscoop cover; this one and the previous photo should show th openings from the upper side. Let me try to describe what I did.
I used a hobby knife (with a new sharp blade) , starting from the underside at the front of the large cavity (on the centerline of the wing), and cut a 1/2" square hole, more or less, angled forward & towards the upper surface. I completed & cleaned up the edges of this air duct hole from the top.
Then again starting close to the rear part of the underside deep recess, I started another ~1/2" square air duct hole angled back towards the trailing edge. You can see the openings on the top surface in one of the photos.
The idea is to have air flowing in the front duct, and back out the rear duct, with the ESC mounted so the airflow goes past both sides of the ESC.
If you have a large brass tube (9/16" O.D. or larger?) you can sharpen the inside of one end with a hobby knife until you have a sharp cutting edge on the brass. Then use it to cut clean round holes through the EPP foam, twisting as you go. (It's quite easy to control the orientation of the hole you are making as you go using this technique.)
I hope this helps.

[Posted on March 21st, 2006]
[QUOTE=kaz1104]Hi Guys, Some pics of my well worn Wild Wing (note missing paint and slashes between the fins from prop strikes). Nose is an EPP "swimming pool noodle", gives it sort of F-27 stryker look and serves to protect the battery that bit more, plus adds a llittle nose weight without using lead. Receiver antennae is run through a plastic tube then buried in the wing skin to reduce the chance of damage. Brace on the motor mount runs right through to serve as a good solid hand hold for throwing it. Good to see everyones take on these wings. i believe the wild wing is a better flying model then the F-27 stryker. My wing is far from a lightweight at 614 grams or a little over 19.5 oz, but this seems to be no handicap to the way it flies. Runs a 1750 kV motor and 7x5 prop on 3 cell 2200mAh Li-Po pack. 18 Amp speedy sits under the supplied engine mount cover.
[Bruce's Reply:] kaz,
I like the looks & concept of the extended EPP nose fuselage section- nice work! I set up my first ZAGI electric with an extended nose & tractor motor because I could not balance it decently with the kit's recommended motor location. Wild wings suffer from the same balancing challenge. (My light Zagi is now converted back to being a light non-powered slope glider for light wind days.)
(Carrying that battery on mine just under the nose on the belly in the stock kit cutout is one of the things I still am less than enchanted with... LiPoly batteries especially should be protected on landings. If I look at all of my other slope wings, the underside of the nose is the place that shows the most evidence of encounters with Terra Firma... I'll still have to give that aspect more consideration, and will likely make a battery cover from tougher material.)
Cooling the battery for summer flying is another issue to be dealt with later; right now, we are still seeing sub-zero nights high in the Rockies. (Most of our winter snowfall arrives in March and April.) Lots of deep soft snow has been falling here recently, so my Wild Wing has not been tossed into the air yet.
[March 21st, 2006 post]
I had a chance to fly my Wild Wing in light snowfall on Tuesday afternoon ; the wing is flying great, and the motor has very good authority. (However, the light was very flat, and on those kinds of snowy days even the hot fluorescent yellow which I used on the top of the wing would go into stealth mode at a distance in some attitudes. Good thing the underside is hot Fluorescent Red!
Oh, about that "grab it by the wing tip & discus launch it" technique??? .... well, unless you have a peanut gallery that you're just itching to entertain, it might be one of those things better left to the Discus launch HLG planes; without an equal amount of vertical stabilizer both under as well as on top of the wing, the stability doesn't seem to be there for me... (or maybe I just wasn't holding my mouth right?...) Ok, go ahead and try it- if nothing else, you can give some of your friends one of those rare ROGL episodes... (and me without anyone holding the camera yesterday!
Power off glide was very efficient & promising; I'm looking forward to getting this one out on the slope, too. When I get a chance to fly on another day with better light conditions, I'll be able to crowd the performance envelope farther.
[March 26th, 2006 posting]
I had another couple of flying sessions with my Wild Wing. It's flying GREAT. Flying weight with the 3 cell 1500 mAH LiPoly battery and all hatches, tape, trim, and the belly skag taped in place (for easier launching) is at 13-5/8 ounces. The 16 wind G.B. kit motor, (22.7 mm, single stator, N50 magnets), turning the 7x4 prop if flying this wing very nicely, with good authority; don't have a speed gun to check it, but it's getting around the sky QUICKLY at full throttle.
At this weight, it has a very respectable glide, too. The characteristic I'm liking is that there is no tendancy to suddenly drop off into one of those classic "Zagi Death Spirals" that many other wings slip into at stall. Instead, when gliding into the wind and I pull up the nose gradually towards the stall point, as it gets close to stalling, you can see it start to rock it's wings a bit... this is a a very slow airspeed. If you just drop it's nose a bit when you see this minimal wing rocking to pick up a bit of speed, it's flying fine.
If you are flying with radical elevon deflections & you stall the elevons & drop it into a spin, simply letting off of the stick for a second allows the plane to recover control authority and allows you to fly out of the spin fairly quickly... NICE recovery capability!!! This wing has a very good airfoil!
(At 17-18 ounces flying weight, it might not be quite this well mannered... maybe someone flying a heavier WW will comment on spin entry & recovery characteristics at the higher wing loadings?)
So I'm definitely happy with my kit bashing results. There's really only one detail I'd adjust: My motor incidence line ended up a bit more positive than optimum, in that there's about 6 clicks of trim difference between power on flight, and power off glide ideal trim. (In other words, if trimmed for power off gliding, it climbs rather steeply under full power.)
A previous post spoke of how I set the C.F. tube motor mount. I'd likely raise the front end (towards the wing's upper surface) by maybe another 1/16", while keeping the rear end of that motor mount tube centered on the trailing edge. That might take out most of the trim difference between power- on & power- off flying. I may decide to cut & reset it to find the ideal motor thrust incidence yet after I' ve flown it a bit more... but other than this one detail, it's really flying well right now.
Friends,
My Wild Wing is flying great; I have been flying it with a 7x4 APC prop, which seems to be a perfect match for my motor / battery setup.
At well under 14 ounces, it glides well with power off & will ride thermals nicely... but the fixed prop is 'a drag'.
Recently I was out on one of my favorite slopes, flying it in the slope lift, and again noted that the prop would windmill & create unwanted drag when gliding with power off. The CC Thunderbird 9 ESC has the prop brake function enabled, but electronic prop brakes only short the windings to apply enough resistance to allow a folding propeller's blades to fold; with a non-folding prop, this does not serve.
Powered slope flying & thermal riding would be more efficient without the drag of the windmilling prop. Suggestions of other possible options for suitable folding props would be appreciated. Does anyone know of another folding prop which might serve this purpose? (3mm motor shaft size, 7x4 blades.)
So far, the SkyScooter prop set blades & midpart are the only thing I'm aware of in blade shape which are easily able to be adapted / modified, but the blade pitch is higher than I would like to use for the Kv of my motor.
[UPDATE]
I just got off my butt & shortened the blades on the "FUNTEC MODELS #80104" Folding prop set, designed for the standard Sky Scooter. This is normally a 8.5 diameter prop; I'm thinking the pitch is about 6", but I'm not certain.
Anyway, to get the current draw into a reasonable range on my 16 wind motor (running on a 3 cell LiPoly), I started shortening the blades while testing current with my WattMeter. By the time I had trimmed it down to 6.2" diameter, the current (static) is down to 10.3 Amps- reasonable.
The test flight in the small patch of sky just off the end of my driveway shows good performance; I'll fly it more later, but this one is already working!
Here are photos of the prop; I drilled out the inside diameter to about 3/16" to fit the E-Flite 3mm prop shaft adapter, & cut off some excess plastic.
2nd UPDATE: I flew the modified Sky Scooter prop a bit more this afternoon in windy conditions in a larger open area. While this modified prop is capable of folding, there seems to be a tendancy for the blades to continue to windmill due to the air moving over the wide shaped blades unless you slow the wing down. But if the speed is dropped, the blades do fold back nicely, and stay there once folded & stationary.
The nice thing: There is no way to damage the prop, or to bend the motor shaft by catching a prop on landings on rough terrain, when using a folding prop. From this perspective alone, this experiment has been of value.
The experiment continues!
Friends,
I had a chance to put the Wild Wing with the new folding pusher prop through it's paces more thoroughly later this afternoon (Thursday, April 27th). It's definitely doing the job well!
I started flying light slope lift on a small hill, repeatedly climbing up & flying rolls, loops, spins, etc. under power, then cutting power and gliding, riding what lift was available. The prop would consistently fold back, then stay folded each time once the air speed was allowed to drop back sufficiently for the windmilling to cease. Restarting the motor was also no problem; it spread it's blades and climbed out nicely over 20 different times- sometimes within a couple of feet off the ground before power was applied.
Next, I climbed up away from the small slope face, looking for lift. It didn't take long to find a patch of rising air, so I rode that one a while in soft lift, then bailed out hunting another.
I caught two nice ones, with the Wild Wing specking out twice over the next half hour. Each time, it was necessary to fly out of these thermals agressively; I would use a fairly tight spiral / diving spin to drop back down to a lower level, then cruise off to find another patch of lift.
(Fine thermaling!)
After about 3/4 hour of fun, I brought it back down & headed back home- a nice late afternoon break! I certainly could have easily stayed up higher in the lift for longer, but I had other things to get done yet today.
CONCLUSION: The Sky Scooter folding prop comes at 8.5"x6" , and can be either flown as sold on some motor / battery combos, or trimmed to a shorter length for some other motor / battery combos. At 6.2" length, mounted to the 16 wind GBv kit motor on a 3 cell 1500 LiPoly pack, it's flying my WW very nicely!
With this light weight Wild Wing flying at only 13-5/8 ounces, it's very capable as a thermal ship; the main problem is that a 36" wing gets very small quickly in good thermals.... Say, on second thought- maybe that's a 'problem' we should all have more often!
It looks like this prop could be staying on my Wild Wing a lot of the time!
(Of course, if some days I feel the need for speed, it's quick & easy to swap back to something like the APC 6x5.5 prop for that, too!)
[NOTE: The Space Scooter folding prop is listed at $9.95 by Hobby People: http://www.hobbypeople.net/gallery/758104.asp ]
NOTE: The Sky Scooter / Space Scooter folding prop set is also listed by Tower Hobbies for $9.49, but is also out of stock until "late May" http://www2.towerhobbies.com/cgi-bin/wti0001p?&I=LXVB70&P=X ]
May 5th, 2006 Flying Report
Sunday found two of us on the top of a steep ~250 foot high slope face in the middle of the South Park region of the Central Colorado Rockies, flying variable winds. Some of the time, the winds were stronger out of the WNW, square into the slope face and generating strong lift, and other slope ships were launched into that strong slope lift and flown for a while...
But with storm clouds hanging over the tops of the Mosquito Range a few miles to the NW, the winds were variable- they would quickly shift around well to the NNW and North, and stop generating lift on the slope face, forcing quick landings of the non-powered slopers.
At other times, with modest sized thermals moving through the area, it would transition from strong lift to strong sink, to dead air, quite regularly. It wasn't the best air conditions for flying some of the slope ships we had brought out that day.
That's when we launched our E-powered Wild Wings. We could punch out in front of the slope to find patches of lifting air, or ride soft lift on the slope face without worrying about being forced to set down low when the lift died... we could even play around on the back side when a bubble of lifting air crossed through, knowing we could easily power back over to the front side if the air wasn't good there, or after it moved on out of the area.
With my light wing loading & folding prop, I needed to use only a brief motor runs occasionally to keep in good air, riding the winds / lift easily and efficiently with minimum drag (between the brief power applications I could use whenever necessary.)
Being able to fly low & in close to the face & ridge top, while knowing it's possible to quickly climb out of bad air if necessary, is really nice! Controlling your choice of landing spot on less rocky ground on the top of the slope just to the back side of the face is also really nice!
(The other Wild Wing flying Sunday was still equipped with a fixed 8x6 prop on a BP21; it could climb out very impressively... but with the motor off, you could hear it windmilling, & really notice the drag it produced, challenging it's sloping / 'Slermaling' ability and efficiency. It is scheduled for a folding prop upgrade before long after that day's experience.)
The Sky Scooter / Space Scooter folding prop is still the only one we've come up with for easily modifying & flying as a folding pusher with minimal drag on the Wild Wing; it's available from http://www.BPHobbies.com as a replacement part listed on the Space Scooter page: Multiplex Space Scooter replacement propeller (M722490) Price: $7.49
A quick update, May 8th, 2006:
While clowning around low & close in for the camera, I inadvertently flew across the sun & lost view of my WW for a precious fraction of a second while flying wildly & far too close in... the result was an encounter with Terra Firma.
I had built my Wild Wing very light for an E-powered WW, and had used HS55 servos and carbon Fiber control rods. Those are fine for normal E-flight and thermal riding in the flats... but on the rocky slope top, the rough landing was very hard on the servos... it damaged the servo gears in BOTH elevon servos, and actually broke one of the .060" diameter C.F. control rods.
(The very small nylon gears in the HS55 servos simply were not built for this kind of abuse- but, hey- a guy's gotta crowd the envelope- especially for the camera!
So I replaced both servos with HITEC HS81MG servos, and built up new metal contro rods. The flying weight increased to 14-3/4 ounces (E-powered, 3S 1500 mAH LiPoly battery onboard.) This is still well within the weight range where the Wild Wings fly superbly, and likely is still about as light as electric Wild Wings are flying.
With a wing area of 290 square inches (2 square feet), this puts the wing loading at 7-3/8 ounces per square foot.
I'll save the light HS55 servos (once I replace the gears) for a mellow park flyer; I expect that I will not have to replace servos again in this Wild Wing anytime soon!
Posted 5-09-2006, Evening
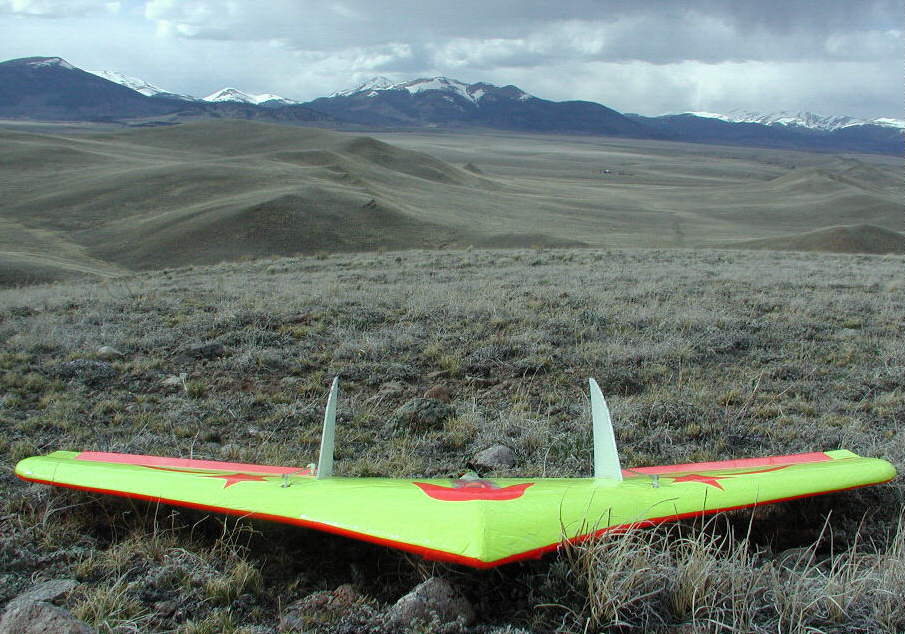
Friends
Here's a photo I shot while out checking out some newer slope flying terrain late this afternoon; my Wild Wing is in the foreground, with a major N-S trending slope ridge structure running away to the north, along the right side of the picture. the "KING" slope site is in the distance- so far up along the ridge that it's about lost in the distance. The skyline is the North Mosquito Range section of the Continental Divide running along the north edge of South Park.
(Not too shabby a background for a bit of flying, I'd say...)
The winds were more northerly than ideal, and the North facing structure from which this shot was taken was rather narrow & not lifting over a wide area... but it was a good excuse to get out & explore some new slopes, fly the Wild Wing a bit, and breathe a lot of good fresh air.
(Who would want to fly the same slope all of the time???)
From this view of a patch of our extended 'back yard', you ca begin to understand why I set up my WW for powered sloping & 'slermaling', and love the folding pusher prop!