


Overall Length = 31-1/2"
EPP Foam fuselage, 1.3# density, ~14" L. x ~6-1/4" H. x 3/4" thick
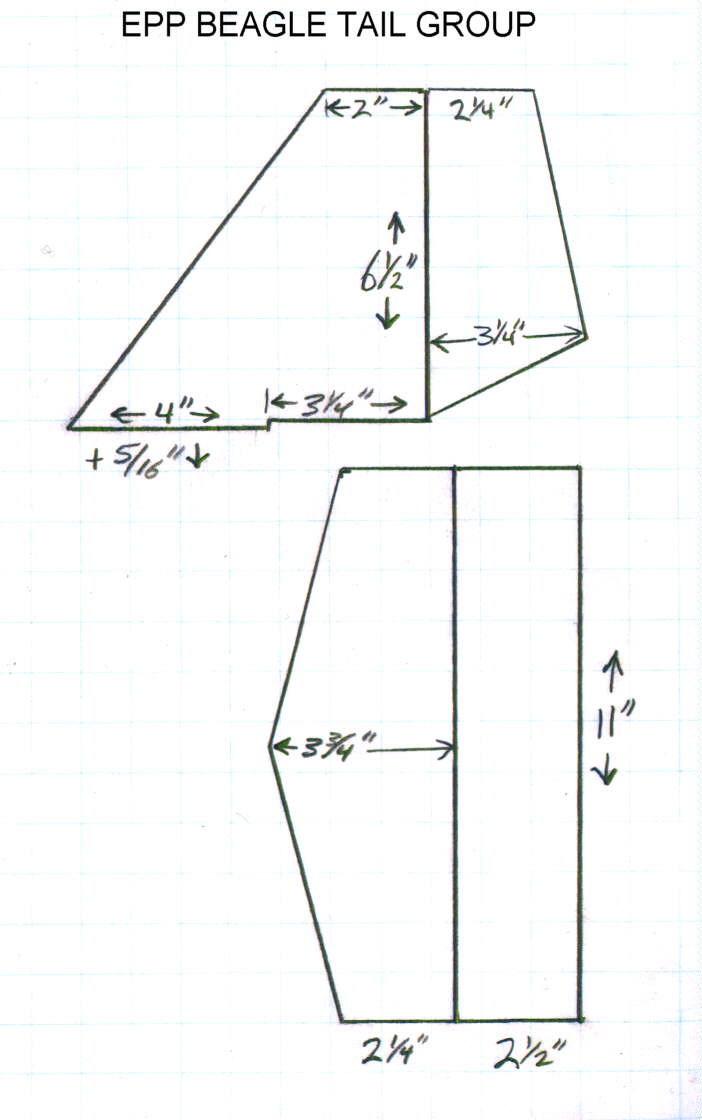
BlueCor tail group; H. Stab. span= 11" ; V. Stab. height = 6-1/2"
3/16" (.157") diameter C.F. tube fuselage aft boom & motor mount shaft: total of 24" length used for both
48" x .060 diameter solid C.F. rods (cut to 23-3/8" $ 24-5/8") for control linkages with .032 music wire ends
Motor Options: GWS LPS RXC, B gearing 5.0:1, 7.2V motor and matching ~5 Amp ESC; or
GoBrushless.com GBv kit CD-ROM Motor, 18 to 21 wind WYE configuration, and Castle Creations Thunderbird 9 Brushless ESC
Battery: 2 Cell 1300mAH LiPoly or similar
Propeller : GWS 9x7 for GWS LPS B (for flying at 10,000 feet); 8x4 to 9x4.7 prop for GBv motor on two cell LiPoly
Current Draw, static, with this battery / propeller combo= 2.4 Amps for GWS LPS B; (more for GBv Brushless.)
Input power with GWS LPS = 16.8 watts
2 GWS Pico Servos, or Bluebird BM-306 servos installed for Rudder & Elevator
GWS R4P or BlueBird 4 channel single conversion receiver initially installed; Berg 4L from Castle Creations also highly recommended
Flying Weight before final dress-up work: 7-3/4 Ounces& up
Final Flying Weight after tape covering & all graphics & painting complete: 8 ounces to 8-3/8 Ounces (Tape adds a lot; paint adds the rest.)
Final Wing Loading for EPP Beagle #1 = <5-1/3 Ounces per square foot


Here's the Balsa Products parts links for motor, ESC, Receiver, & spare JST connectors; (they also have micro servos & propellers):
GWS LPS RXC Light Power System (GW/LPS-RXC-B) 5.0:1 gear ratio, for 2 cell LiPo, $13.13 [I use a GWS 9070 prop at 10,000 feet on this 'B' gearing]
GWS R-4P Series II FM Pico Receiver - Futaba/Hitec - Horizontal (GW/R4PII72/H/F) [They have another model for JR / Airtronics transmitters; NOTE that when the new Castle Creations / Berg microstamp 4L receivers are finally available, they should be a great option to fly in busy flying environments! ]
Two-Pin Female JST Connector - charging plug (W22FM/2PJST/30)(for adding to ESC)
BLUE ARROW 5 Amp Speed Control for brushed motors running on 2 Cell LiPoly battery (6V cutoff), with JST connectors $12.95: (We are running 2.4 Amps on the motor / propeller combo, so this ESC should be lighter, very capable of doing the job for this aircraft, and comes set up with JST connectors already attached in place! Blue Arrow 5-Amp ESC for Brushed Motors / 2-Cell Li-Poly (BA-PP-5B JR/Hitec)
Optional higher current ESC for berushed motors, to 10 Amps10 Amp ESC with cutoff set for 2 LiPoly Cells; by BLUE ARROW; for Brushed motor, 12.95- heavier wire, without the JST connectors
Blue Bird 306 micro servo, 6.3 grams, $14.49
Balsa Products offers a similar size & weight battery by ETEC, without JST connector, for $29.99 each; (Dymond offers the battery I use with the JST connector attached for $19.00E-TEC Lithium Polymer 7.4V 1250mAh HP
DYMOND is the source for the battery I'm flying in the BEAGLE: Dymond battery part # 22784 $19 each (& 6.95 shipping charge minimum always added on all orders) DYMOND Lipoly hd 1300 10C 7.4 V 64 g 54x34x20 mm with JST connector, silicone spacers
INTO THE WIND KITES is one source for the .157" O.D. tubular C.F. tube that I use for the tail boom and motor mount stick; they also sell the .050 Dia. x 48" long solid Carbon Fiber Rod we use for the contro rods. (1/32" music wire is used for the control rod link ends.)
Plans are not available yet at this time; the photos and this text may offer enough information to inspire some other builders to build something similar. I'll add more when time allows.)
This EPP Beagle is an adaptation of the Blu-Beagle design by Gene Bond, on the RC Groups Foamies forum; Gene- Thanks for the inspiration!
Here are some of my postings to the above discussion forum thread on building the EPP Beagle; newest additions are at the end of the page."
EPP BEAGLE Fuselage Build : 12-27-2005
[GPW mentioned the concept of making a Beagle fuselage from EPP foam; I had already been working on the approach]
I'm close to test flying an EPP fuselage version now; I'm in the process of the final setup, and I'm discovering that this Beagle's nose could possibly benefit from some additional stretching, to allow for balancing & flying with a lighter 2 cell LiPo (without adding penalty weight in the nose to balance- I just HATE having to do that!)
The front profile of the EPP matches the neat Snoopy graphics you did up, with more room for longer ears flying out behind his head.
In consideration of our thin air at 10,000 feet, and in wanting to build a light slow flyer with low wing loading, I designed this one around a GWS LPS geared motor system with CC Pixie 7 ESC, [with enough clearance to swing a 9x4.7 or 9x7 prop]. I built up a 33"x7" wing, ~5% camber [actually measured later at 5.2 % camber], with flat center panel & raised tip panels, with the bamboo skewers at the L.E. & T.E. of the center section.
To help minimize the aft weight, I used a .157" dia. C.F. tube for both the motor mount and for the aft fuselage stick; I also used .060" dia. solid C.F. rods for the control rods, with 1/32" music wire ends mounted.
For the EPP fuselage, I hot-wired some 1.3# material down to 3/4" thick- the thickness of the larger LiPo battery packs which I was considering using. In stretching the nose length some & getting the fuselage tall enough to have the prop clear the tail boom and still provide some belly depth / protection beneath the servos, I ended up using a piece 14" long by about 6-1/4" high; weight before final shaping was still only about 5/8 of an ounce- a reasonable weight for this design. [With the bare tail boom installed on the 2nd EPP Beagle fuselage before any other materials were added, the weight was at 26 grams.]
While the Pico servos and Pico receiver are mounted well forward, I find that I need to use the 1300 mAH 2 cell LiPo pack to get it balanced in the recommended range (~2-3/8 ounces pack weight.) This still leaves the flying weight light at 7-3/4 ounces before the final 'beauty work' is completed. That keeps the wing loading under 5 ounces per square foot.
I have a background of designing EPP slope combat ships; it comes natural from this background to bury components into the EPP foam, so the receiver and servo wires, as well as the Rx antenna are buried in the foam, with nylon fillament tape covering & reinforcing the shallow slits in the foam. The servos could also be buried deeper in the foam with only the control arms extending out, but since this is a slow flyer, I did not do it on this one. I did try to have enough foam beneath the servos to protect them fairly well on landings. There's also at least 5/8" of EPP between the front end of the LiPo battery and the front under- surface of the nose.
Cross-fiber nylon filament tape is wrapped around the front & lower edges of the fuselage for durability on landings. The ESC sits up in the air on Snoopy's forehead for good cooling.
A bit more nylon filament tape will go in around the battery compartment, then some battery side covers, and it will be ready to venture out for a test flight. (The art work will have to wait until later- time to fly!)
Bruce
***********************
GPW posted:
V60 ... That's so COOL !!!!!!! Looks VERY durable !!!!!!! Nice !!!!!!
Guys we need to address weight savings in the tail .... some considerations are ;
1. a tapered boom , getting smaller on the aft end...
2. 3mm dep/ or thicknessed' FFF tail surfaces ....
3. thread pull/pull controls....
less weight in the tail , less in the nose ....TRUE!!!
**********************
Bruce's response:
GPW, Thanks for the kind words! The EPP is definitely very durable - especialy on an 8 ounce aircraft!
Good suggestions!
I would need to get some 3mm Depron ordered and put together a lighter tail on another fuselage- (I did not have any on hand when I built this one, so I used BlueCor.) It definitely would help get the tail weight down. The pull-pull kevlar would certainly help substantially in accomplishing this, too, & minimize the weight of the control linkages.
This Beagle fuselage with the BlueCor tailgroup will balance & fly with the two cell 1300 mAH LiPoly batteries; (I may put a light CDROM motor in place of the LPS geared system on this one to have more power available when wanted, and put the LPS motor system on another lightweight Beagle; test flights await an improvment in the very windy weather here in the Colorado Rockies. )
****************************
Gene Bond commented, "Nice Adaptation!"
Bruce responded [1-1-06]:
Gene,
I have to confess that after over 20 years of scratch building and designing aircraft, I'm more than a bit irreverent about other people's plans; designing for flying at 10,000 feet does add it's own considerations. I really liked the Beagle, and also liked the idea of using EPP & CF for maximum durability... and I not only enlarged the wing area, but then enlarged the tail group and stretched the tail moment to give it good stability.
So as you noted, mine is an 'adaptation' of your inspirational design, and I thank you for the fine inspiration!
Winds were finally down by the afternoon of New Year's Eve Day, and after we had gathered with some good friends and feasted on a Turkey with all of the trimmings, three of us headed down the road a couple miles to some 'wide open spaces' - large hay meadows- to finally fly the EPP Beagle.
I had built two wings, both with a 33" span x 7" chord; the first was built with the 5% undercambered airfoil and a 16" flat center panel with 8-1/2" raised tip panels. The second wing was built with a 8.8%/40% undercambered airfoil with a 15" center panel and 9" tip panels. (There is about 2-9/16" rise at the leading edge of the tip panels from the polyhedral joints, with only 1/16" washout at the outboard panel trailing edges.)
The power system is a GWS LPS RXC, which has a 7.2 volt motor and 5.0:1 gearing, running on a 2 cell 1300 mAH LiPo, swinging a 9x7 GWS prop in our thin air ; (a 9x4.7 is the recommended optimum sea level prop for this motor/ battery combo.)
Winds were variable, with our typical winter mid-afternoon 'cold thermals' with turbulent air marching through fairly regularly, with winds down to almost nothing in between. Time for this Beagle to FLY!
I mounted the 5% camber wing first, and it flew well, despite the variable winds. Both of my flying buddies had not been out flying in quite a while - (Phil confessed that it had been close to three years since he last flew!), but they did well when I handed them the transmitter.
With the modest power system, this Beagle definitely flies on the wing- and does it very well! It can hover and fly backwards at low throttle settings when the winds come up, but has enough authority at full throttle to fly back upwind in 15MPH+ winds when some of the turbulent winds would cycle through... (we were flying with the sun & wind at our backs most of the time.)
The higher camber wing went on next, and it quickly became obvious that this wing was more stable with less 'wing rocking' in the hands of my friends, and could be flown at modest throttle settings in low & close. At full throtle, it would still penetrate the winds when they cycled up stronger & more turbulent, but I could get more irreverent in my low & slow flying, doing very slow landings right at our feet.
We flew out most of two battery packs, ended up with heavy grins, and headed back to the shop for some construction work. These guys were confirmed Beagle fans by that time!
(The ladies were watching the football game, while we were flying & then building- how's that for ignoring the typical role stereotypes!)
Before they left later that evening, two more EPP Beagles were completely built up, ready for the gear when it arrives! That's about the quickest project I've ever worked with friends to complete; thanks to EPP, BlueCor, Hot Melt Glue & 5 minute epoxy, it's definitely possible!
The South Park Beagle Squadron is growing!!!
************************
Gene Bond wrote: "Great adaptation, again. The higher chamber wing should be stronger as well. I haven't really spent too much time trying a bunch of different ones, but I do know the 4% works much better than the 15% or so we've tried on others. I wonder if the thin air affects that parameter as well?"
Bruce responded [1-1-06]:
Camber at high altitude: EPP Beagle gets the art work
Gene, I expect there's some effect of the ~16% thinner air on the lift of the flat plate undercambered airfoils, but I can not yet say how much; I'll probably do a new ~6%/ 40% wing soon, & look for a good low / no wind day to compare all three wings. The 8+ % camber is flying nicely & handles very well when slowed way down, so that wing / % camber will see a lot of service.
Today was a good day to get on the art work on the EPP; the photos below show the results of my modest efforts using Sharpie and Pantone permanent markers directly on the EPP.
Weight of the EPP fuselage with tail boom and motor mount shaft of .157" C.F. tube hot-melt glued in place is 26 grams after the art work, before any component placement or taping, etc. **************************************************************
The EPP Beagle has about 14-1/4" of exposed rear tail boom, with another ~5-3/8" of it's length glued into the EPP foam, for a total boom length of 19-5/8". A 4-3/8" piece is used for the motor mount, for a total of 24" of 3/16" C.F. tube. (Note: the tail boom length was shortened on later beagles.)
On the EPP Beagles of the South Park Beagle Squadron, we are using the 9070 prop on the GWS LPS RXC, B gearing; the C gearing would require a 10" prop to optimize the thrust, (similar to the IPS A gearing), and I did not want to go beyond the 9" prop clearance if I did not have to on the EPP fuselage version. With a 2 cell 1300mAH LiPo battery well forward in the nose, the EPP Beagles are balancing out well & flying fine.
(It remains for me to test the A gearing with an 8060 prop; this might also fly OK; the 9" prop on the LPS RXC "B" gearing may be able to produce more thrust at lower flying speeds, which is what I was looking for in a trainer / slow flyer setup for the EPP Beagle. The motor system efficiency (thrust /Amps) listing is better for the B gearing, so I chose to start there.)
At 2.4 Amps, this battery / motor combination could offer up to 30 minute flights (or 3 ten minute flights on one charge).
Keeping the batteries from cooling too much this time of year is the issue that's become obvious over the last couple weeks; as they cool, the output power / thrust does gradually fade...
I'm thinking that "flying on the wing" is what novices need to learn to do to become good pilots, and the Beagle can be a great trainer & fun park flyer to get people into the hobby.
I'll have to think further on making insulated battery hatch covers; (using a layer of the 1/8" thick white plastic foam packaging material may do the job...
A 1/8" C.F. tailboom and 3mm Depron tail surfaces might also facilitate getting the weight forward enough to balance with the 22 gram battery without needing to stretch snoopy's nose - (gotta love that classic Beagle!!!)
I've liked the ease of motor mounting to a C.F. tube (or hardwood dowel) on the LPS housing, with it's round socket; We are using a total of 24" (or less) of the 3/16" C.F. tube for both the aft fuselage boom and the motor mount stick. We wrap clear scotch tape around the motor mount shaft to build it out to the diameter of the inside of the motor mount.) It's best after the building is complete, to drill a small cross-hole through the motor mount & shaft, so that a piece of wire can be inserted through to keep the motor from spinning on the mount shaft; a 1/32" hole drilled through, with a piece of ~20 gauge copper wire is what I am using.
The concept of the EPP Beagle adaptation / design is *extreme durability* in a lightweight, stable and responsive slow flyer. the combination of EPP & C.F. tube seems to be a good compromise in achieving that durability while keeping the weight down to a reasonable wing loading.
My second EPP Beagle, after painting & trim, & after installing the insulated battery hatch covers, is at a ready-to-fly weight (including battery) of 8 ounces; this is 3/8 ounces lighter than #1, which had it's fuselage finished with all of the extra tape... Keep It LIGHT! (Jim's Beagle also came out at 8.0 ounces.)
The wing we are building is made from a 33" span x 7" chord piece of bluecor P/P - (the material with the plastic surfacing film on both surfaces); it has a 15" center panel and 9" tip panels. We are finding that a camber of between 8% and 9% is flying very well for us in the high altitude thinner air in the Central Colorado Rockies. (Lower camber wings down to 5% camber may still fly well, too.)
After cutting the 33" piece of Bluecor P/P into the three panels - [one of 15" length and two at 9"], it's gradually hand-shaped by being rolled over a large shipping tube (3-1/2" to 4" diameter) while shaping it by hand to start the airfoil curvature in the forweard 3/4 of each panel. Then the heat gun is employed on both surfaces, working gradually and progressively to remove all of the wrinkles from the plastic surface films, and to set the airfoil curvature and 'temper' the Bluecor. [Avoid getting in too much of a hurry, or getting too close with the heat gun, as you will possibly 'cook' the outer surface skin on the BlueCor. Just understand that it takes some time to have the heat gently penetrate the foam to the center, and be patient.]
By holding the trailing edge up vertically while pressing the leading edge against the work table surface, while alternately heating the top & bottom surfaces of the wing panel with the heat gun, you can end up with the camber you desire. It's done being shaped when it lays flat on a flat work table at both the leading edge and trailing edge, with all three panels having a matching curvature / camber. You can set some washout in the tip panels if you wish [- trailing edge tips raised about 1/8"]-, but it may be unneccesary on this slow flyer, and may make wing alignment more challenging. If you do decide to add washout, it is best to do it after completing the assembling of the three panels into the wing.
[NOTE: Remove any twists or unevenness / inconsistencies in the three panels before proceeding- it's far easier at this stage, and the undercamber airfoil amount MUST be equal on all three panels for the Beagle to fly at it's best.]
Both sides of the dihedral joints are then sanded back at an angle to allow them to mate / match when the tip panels are propped up to the correct dihedral (polyhedral) angle. I'm setting these so the outer ends of the tip panels are 2-9/16" off the work table surface at the leading edge; (that's an angle of very close to 16 degrees.)
When the angles are matched on the wing joints, both end surfaces that are to be joined are 'wood-peckered' with a pin to allow the epoxy adhesive to penetrate back into the wing core material farther. (I personally prefer to use 5 minute epoxy to secure the wing panel joints; hot melt glue does not penetrate as deeply into the foam, & is far less suitable for this particular job, although it's great for other aspects of the Beagle's construction.).
The two bamboo sections are then glued to the center section of the wing at the leading & trailing edges with low temperature hot melt glue; depressing a groove into the foam first leaves a nice recess into which to glue the bamboo. We also use an overlay of tape (just 3/4" wide Scotch clear tape) to keep the bamboo skewer solidly in place. [This may almost be overkill, but does not add much to the overall weight, and may significantly extend the service life of the wing.]
The final step is to once more 'eyeball' / measure the wing for straightness / alignment. If you wish, you can then carefully use your heat gun to add an equal amount of washout (rise) to each trailing edge wing tip. We're only using about 1/16" to 1/8" of washout on each tip. Make sure there is an equal amount of washout / trailing edge rise at each wing tip, in order to have the wing generate equal lift on either side and fly straight without having the rudder offset from center; if it's not equal, the wing tip with more trailing edge rise / washout will act like a raised aileron, dropping that wing tip in flight and causing the Beagle to turn in that direction.
To state this a bit differently one more time: If there is more washout (rise)in one wing tip at the trailing edge than at the other (or if there is twist in the center wing panel) it will act like there are off-center ailerons... if it's off much, it can be more than your rudder trim can offset. If, when flying, you experience a turning to one side that you can not trim out, the wing tip on that side of center which it is turning towards is extra high on the outer rear corner, or else the opposite side is not high enough. (Also make sure the forward fuselage is straight after installing all of your components- no distortion in the foam that could result in a curve or 'banana' effect! If everything is equally set up, it will fly with the rudder in alignment with the vertical stabilizer.)
I hope these details help those who are just starting to shape undercambered BLUECOR wings! They may be a repeat of info you'll find elswhere; I just know it works for us.
AN ADDED NOTE ON THE EPP FOAM FUSELAGE: It may be best to route the wires from the ESC going back to the motor up onto the top wing saddle surface, embedded slightly into the EPP foam where the wing leading and trailing edges are mounted to the fuselage foam. If the wires are instead inset into one side or the other of the EPP foam fuselage, they may exert too much of a spreading force, distorting the shape of the EPP so that the wing does not sit parallel to the horizontal stabilizer when mounted in place.
Someone had a question about the C.F. control Rods:
Are your carbon fiber push rods running inside the boom or outside? Outside.
If outside, what supports them?
[Response]
I route them through two short pieces of ~3/32" O.D. plastic tube each- one at the back end of the fuselage, the other at the Leading edge of the Vertical stabilizer The object is to keep them low, well clear of the propeller.
I tape the plastic guide tubes in place into shallow grooves in the foam at the fuselage's rear end, and either use tape or thread and CyA glue a to attach the second set to the tail boom just at the leading edge of the vertical stabiliver. I only use the thread wrap and CyA once linkage length & setup is finalized. (If for some reason you need to work on the linkage rod, you'll need to be able to take these two tubes loose again when using Z-bends in 1/32" music wire on both ends.)
NOTE: Using the DUBRO micro EZ connectors on one end of the control rod makes it easy to set your center trim. If you use a Z-bend at the servo end, and the micro EZ connector at the tail emd control horn, you may be able to completely remove the control rod if needed without also having to remove the plastic guide tubes.
Bruce
************************
C. Y. wrote:
" So, are you figuring that the Li-Poly output drops due to cold outdoor temperatures? I figure that there is some internal heat generated in the battery, 'cause the current drawn by the motor is also acting on the internal resistance of the battery, but maybe it isn't enough to keep the temperature of the battery from dropping in the cold outdoors. My flight times are not very great, given the motor size (IPS-A and and battery capacity (1500 Mah).
BKS Reply:
Yes, the batteries cool down, & then can not deliver the same voltage; an IPS or LPS motor system, drawing less than 2.5 Amps, does NOT warm the larger 1300 mAH & 1500 mAH batteries enough to even maintain the cell temperature while flying in cold temperatures unless the battery is enclosed & insulated- that is why I use the thin closed cell foam battery insulating covers in winter, and why I carry my LiPoly batteries in an inside shirt pocket until I am actually ready to fly.
NiMH cells are also subject to being too cold to perform.
GPW says he notices the cold battery effrects at 40 degrees or below... we fly a lot all winter on cooler / colder days.
The LPS motor in the B gearing seemed to be one of the best possible choices for the Beagle, based on the thrust / Amps specifications in the 9" prop size; that's why I chose it. I can fly for up to 30+ minutes at full throttle on the 1300 mAH size pack on warmer days, but I'm really only flying at 60% to 70% throttle a lot of the time, so I've never flown a pack down to the cutoff. I have, however, flown for a few minutes on colder days, and had the batteries chill down to the point where they could not maintain the aircraft in level flight, & I had to land.
So the batteries have to be warm at launch, & insulated enough to maintain their internal temperature during the flight.
Happy Landings!!
NOTE*** Watch out for reversed props on pushers; they do not generate anywhere near the same thrust!
Dear Bruce,
I met a fellow struggling to fly a Hobbyzone Firebird Freedom RTF while I was walking my dog near the Burland ball fields. I struck up a conversation and found out his name was Robert Sims. Robert had seen me flying my GWS E-Starter earlier in the week and decided to go to a hobby store and buy an RC plane. The Hobby Store recommended the Firebird Freedom as a good starter plane. He told me he was seriously disappointed. He couldn't even get the overweight and under-powered Firebird off the ground! He was ready to give up on the whole hobby! I gave him some encouragement and let him fly some virtual RC planes on my Great Planes flight simulator.
I took him out the next day and let him fly my E-Starter. I got the E-Starter airborne, gained a fair amount of altitude, and handed him the transmitter. He actually handle the plane pretty well and decided to trade in the Firebird for store credit. He got a Futaba 4EXA 4-Channel FM Computer Radio with three S3110M Servos and receiver. He also bought a GWS E-Starter and LiPoly battery.
About a week ago, Robert invited me to his first flight with his new E-Starter. Although I tried to talk him out of it, he perfromed a ROG take-off and promptly crashed the plane into the ground!
Enter the Beagle.
With Robert's E-Starter "re-kitted", I lauched the Beagle. I got the Beagle trimmed and showed him how not to over-control. I also showed him how easily the Beagle self-corrected. I handed him the transmitter and he took over flying the Beagle. He did very well for quite some time until he got the Beagle into a low altitude tail slide and crashed the plane into a fence. The wounded Beagle lost it's left wing. A bit of Epoxy and the Beagle was as good as new.
I went out with Robert yesterday evening. After some more instruction, he soled from launch to landing. While he had the Beagle airborne I showed him some subtle techniques for flying the Beagle to make it smooth in flight. He quickly learned throttle control, altitude control, decending turns, constant altitude turns, straight and level flight, landing approach with glide angle, and finally touch down! He perfromed two solo flights and was very happy!
Of course, he now wants a Beagle!
I bought an Optic 6 radio and buddy cord that is compatible with my Hitec Laser 4 radio. I am going to step Robert up to 4-channel with a buddy box. He also wants to spend more time on the simulator.
A good friend of mine was in town last week. He is a very experienced RC pilot. His favorite planes are his .60 powered Big Stik and his .46 powered LT-40 Kadet Senior. He flew the Beagle. He loved it! Prior to the Beagle, he was not that impressed with 3-channel electrics.
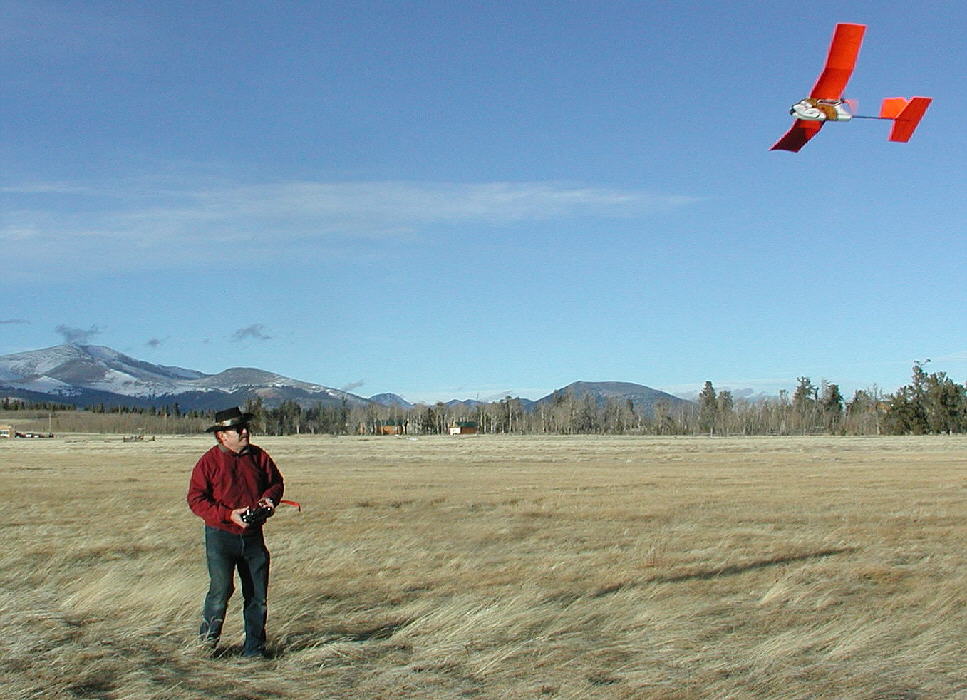
Here is a photo of me flying the Beagle at Kenosha pass. Windy day with good thermals. The Beagle is a pretty decent slope glider. The Beagle rules!
Thanks, Bruce A.


I first removed the GWS geared LPS motor & ESC, then cut off the extended motor mount shaft flush with the rear end of the EPP fuselage. I next cut away enough of the EPP foam around the rear 5/8" of the C.F. motor mount shaft, and installed a plastic bushing over the outside of it to fit the inside of the brass tube motror mount (5/16" diameter.) This bushing tube was glued in place with thin CyA and baking soda. (If I were building a BLU-BEAGLE or EPP BEAGLE for the Kit motor from scratch, I'd simply use a section of 5/16" O.D. hardwood dowel for the motor mount shaft.)
For this Beagle, I built up another GoBrushless.com basic kit motor ($8.99), with the stock bronze bushing bearing, and built it with an added 3/4" long section of 5/16" I.D. brass tube soldered to the bearing carrier as a simple & effective motor mount tube. I wound the single stator with 19 wraps of 26 gauge wire per pole, and set it up in a WYE wiring configuration. I wired it to a Castle Creations THUNDERBIRD 9 brushless ESC (<$26.00). The ESC has the label removed for a bit better cooling; it is mounted on the side of the EPP fuselage with a bit of hot melt glue. A #1 x 3/8" sheet metal screw is used to fasten the motor to the mount shaft.
I still need to touch up the graphics on this EPP BEAGLE... the brown PANTONE marker color on Snoopy's leather flying helmet faded out to a greenish shade since last Christmas... it was supposed to be a 'permanent color marker'... obviously it is not. It's already been touched up some on one previous occasion.
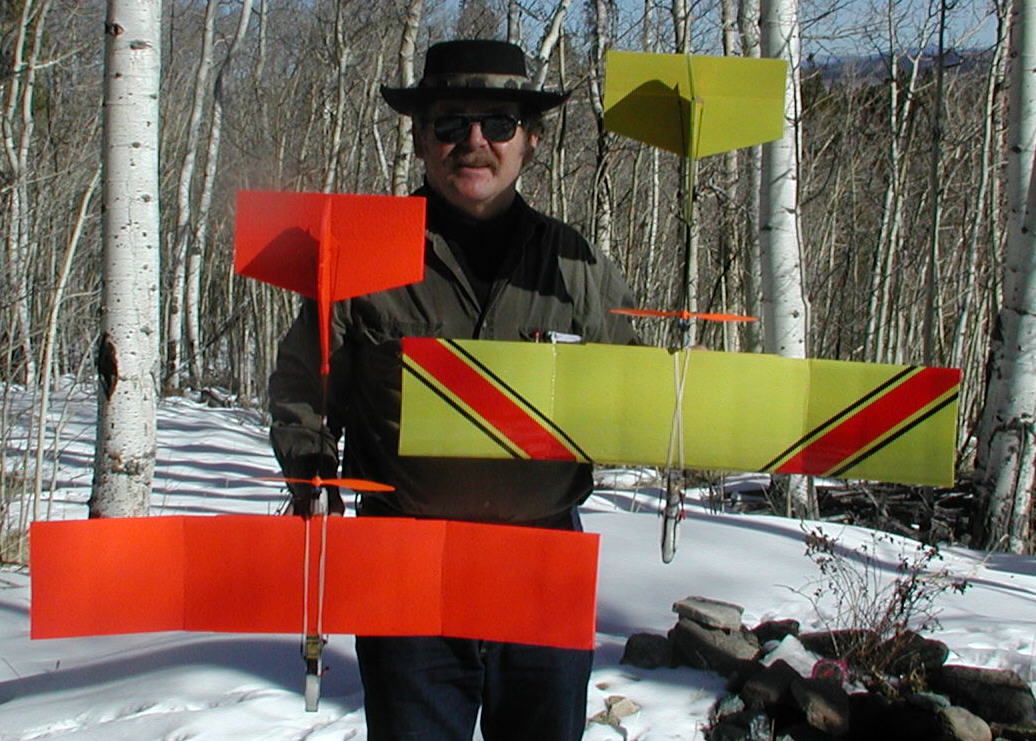
The light was strange, with sprinkles of rain starting to fall when I did a quick check-out flight this afternoon. Using a GWS 8x4.3 prop, this EPP BEAGLE certaiunly has power to spare! I'll be looking for a bright day soon to really ring out this new motor. I'll also try switching to the GWS 8x6 prop another day, as well as test fly it with the other lower camber wings. (The matching wing in this photo has an 8.8% high camber, which performed superbly with the very modest powered GWS LPS geared motors.)


Above is Jim Linn with his BEAGLE; flying fine!

Above is Michele with her Beagle; photo taken after her first flight

Above is a photo of the members of the South Park Beagle Squadron as of 2-26-2006, with six Beagles
